
MacBook Pro (Howto): Install A Solid-State-Drive
In this article I will show you, how to install a SSD into the Apple MacBook Pro. All the essentials of material and tool that is required for the installation are linked in the article.
For the installation of the SSD we have to unscrew the MacBooks, therefore it makes sense to upgrade the main memory (RAM) right now. In a a previous article I have already put together suitable memory recommendations: Apple MacBook Pro: RAM upgrade (HowTo)
Difficulty level:
- Frequently asked questions
- Suitable SSDs for the Apple MacBook Pro
- Data migration
- Installation
- Instruction
- Starting up / completion
Frequently asked questions
What are the advantages of a SSD?
- short start times for operating system and apps
- comfortable and faster work under Mac OS X
- SSD work completely silent
- SSD has no mechanical parts, thus insensitive to hits and external influences
To what should I pay attention with a SSD?
When choosing the SSD, care should be taken that the memory size of the new SSD is not too low. It is advisable to choose an SSD with at least 120 GB or better even 240GB. With regard to the height both SSDs with 7 and 9.5 mm can be installed. All SSDs recommended below meet these requirements.
What are the differences between Samsung EVO/Pro series?
The main difference is the flash memory which is used in the SSD. The new Evo series is designed for the home user and relies on TLC flash memory. This one is reasonable to produce but on the other hand a bit slower. Therefore Samsung could recover this performance disadvantage in the EVO series with a so-called turbo-Write buffer and achieve a similar performance to the Samsung Pro.
I have a detailed explanation of the differences (incl. Advantages and disadvantages) in a separate article: SSD Comparison: Differences between Samsung 860/850 Pro and EVO series
Can I install an SSD with SATA 3 in a MacBook Pro with SATA2?
Yes, SATA3 is fully backward compatible. Therefore SSDs with SATA 3 can be easily operated on SATA2.
Which MacBook Pro models can be upgraded with a SSD?
| Apple-Modell | Display Size | Designation | Upgradable |
|---|---|---|---|
| MacBook Pro (Mid 2012) | 15 inch 13 inch |
MacBookPro9,2 MacBookPro9,1 |
|
| MacBook Pro (Early + Mid 2011) | 17 inch 15 inch 13 inch |
MacBookPro8,3 MacBookPro8,2 MacBookPro8,1 |
|
| MacBook Pro (Mid 2010) | 17 inch 15 inch 13 inch |
MacBookPro6,1 MacBookPro6,2 MacBookPro7,1 |
|
| MacBook Pro (Early + Mid 2009) | 17 inch 15 inch 15 inch 13 inch |
MacBookPro5,2 MacBookPro5,3 MacBookPro5,4 MacBookPro5,5 |
|
| MacBook Pro (Early + Mid 2008) | 17 inch 17 inch 15 inch 13 inch |
MacBookPro5,1 MacBookPro4,1 |
Suitable SSDs for Apple MacBook Pro
[Last update: 15.04.2018]
 Notation
On the market there are a variety of solid-state drives (SSD), but they differ seriously in speed and durability. For this reason I have compiled only high quality and fast SSDs that I could test in MacBook personally in my professional life and as a result I can recommend in good conscience.
MacBook Pro Non-Retina (2008 / 2009 / 2010 / 2011 / 2012)
- Samsung 860 Pro Series, 2,5 Zoll, SATA III Tip
(Available sizes: 256GB / 512GB / 1TB / 2TB) - Samsung 860 EVO, 2,5 Zoll, Sata III Tip
(Available sizes: 250GB / 500GB / 1TB / 2TB / 4TB) - Samsung 850 Pro, 2,5 Zoll, SATA III
(Verfügbare Größen: 256GB / 512GB / 1TB / 2TB) - Samsung 850 EVO, 2,5 Zoll, SATA III
(Available sizes: 120GB / 250GB / 500GB / 1TB / 2TB / 4TB) - Crucial MX500, 2,5 Zoll, SATA III
(Available sizes: 250GB / 500GB / 1TB / 2TB)
Data migration
Before the existing disk is exchanged for a SSD, all data and settings must be saved. There are different approaches.
Option 1: Clone hard drive to SSD
- Before making any modifications create a backup via Time Machine, in case of emergency there is a backup
- Connect the SSD via USB to the MacBook Pro (e.g. using SATA to USB3.0 Adapter)
- The new SSD must first be formatted using Disk Utility (as “Mac OS Extended Journaled“)
- Then subsequently create a fully bootable 1:1 copy of your hard drive to the SSD with SuperDuper! or Carbon Copy Cloner. (This process may take several hours).
Option 2: OS X reinstall and restore the backup
- Before making any modifications create a backup via Time Machine for later restore.
- Create a bootable OS X recovery stick (instruction)
- Now the new SSD have to be installed in the MacBook Pro (introduction see installation)
- After the SSD is installed into the MacBook, insert the USB flash drive. Then turn on your MacBook while holding down the ALT key.
- You will be asked which medium should be used for booting. Select the USB stick.
- Before reinstalling the SSD, it first must be formatted (as “Mac OS Journaled Extendet”) via the Disk Utility. After that OS X can be installed on the new SSD. In order to this just follow the instructions on the screen.
- Finally, the data and settings from the Time Machine backup will be restored now.
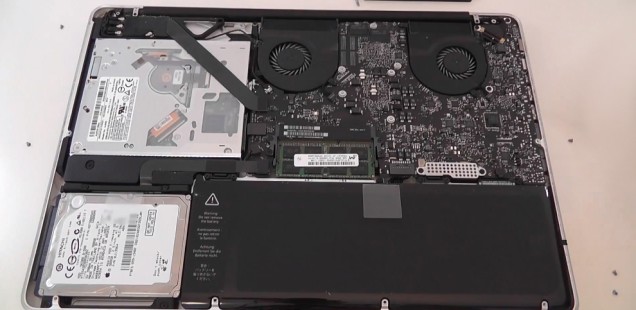
Installation
In principle, everyone who doesn’t have two left feet can do the installation. The important thing is to allow oneself plenty of time for the installation and proceed with caution. There are two ways to install a SSD in the MacBook Pro:
Option 1: Install SSD as a second drive
Everybody who needs a lot of memory or uses the DVD drive rarely, can install a second hard drive / SSD to the place of the Super Drive. For this purpose, a special frame (conversion kit) is required in which the hard disk will be installed. Then the removed SuperDrive comes in an portable USB enclosure, which is included in the conversion kit.
I made very positive experience with the following four conversion kits:
Option 2: Replace hard drive with SSD
The replacement of the existing hard drive with a SSD is the easiest way. This reconstruction is completed quickly with little effort (about 10 minutes). For this purpose, no special accessories or conversion kits are required, only a proper SSD and the appropriate screwdrivers.
After the SSD is built into the MacBook, it makes sense to use the removed hard drive as an portable hard drive. A good portable enclosure with a fast USB3.0 interface is, for example ORICO portable USB3.0 enclosure
Tools
If you decide on the installation variant 1, the conversion kits I mentioned have already all tools needed for. At the Flancrest kit there is even a SATA-USB adapter enclosed to clone the hard drive without a separate 2.5 “USB hard drive. Otherwise, the mini screwdriver set from Hama is recommended that contains the required PH00 and Torx6 screwdrivers.
Safety recommendation
Basically, it is recommended when working within range of electronic components, to wear an antistatic wrist strap. It protects against electrostatic charging, thus preventing possible damage to electrical components in the Macbook. The bracelet is slipped over the arm and has a cable with alligator clip which is simply clamped to the radiator. Corresponding bracelets are already available for a few dollars (e.g. Rosewill Anti Static Wrist Strap).
Preparation
Basically a Time Machine backup should be created. If this is completed, the MacBook Pro can be shut down. Afterwards unplug the power cord and other cables and place them upside down on a soft surface.
Instruction
The following Youtube video explains the installation procedure in great detail:
Starting up / completion
After installation, the MacBook can now be started for the first time from the SSD Pro. Please do not be alarmed if the boot should not be noticeably faster after a new installation. Because Spotlight must rebuild the index from scratch, which can take some time.
Should there still be any problems (e.g. durable high-revving fan), in addition the SMC (introduction) and NVRAM / PRAM (introduction) should be reset.
Rate this Post:


4.70/5 (10 votes)
Just bought a Kingston ssd hyper X salvage 480gb for my MacBook Pro 13 mid 2010
Unable to clone or reinstall
* it keep freezing on startup on the apple logo
Do you have any experience regarding this?
Great guide! Thanks.
Hi Thanks for your update and instructional video. unfortunately I’ve hit a road block and my computer isn’t working right.
I have a 2012 MacBook Pro with the 500GB HDD. last week I started getting the flashing folder at start up. when i started it in recovery mode my HDD wouldn’t be recognised. I chose to replace the data cable and get the 850 Samsung evo 250GB SSD. once I went through installation the my Mac won’t recognise my SSD. However when I lug in the samsung evo via a SATA usb cable its starts up. I’ve recovered it installed Mac OS X mountain lion which was factory standard and then upgraded to the new OS X Sierra fine.
Im trying to figure out how can I get my Mac to recognise my SSD when I install it back. when I install it back its still giving me a flashing folder HELPPPPPPP
Hi,
Could you please explain why one cannot upgrade the existing SSD in my Macbook Pro 13″(Retina Display)(128GB) Mid 2014.
MacBook Pro Retina (Mid 2014) 13 inch – MacBookPro11,1
Your article shows a warning sign for the above Laptop.
Is it not possible to upgrade this?
If it is possible – what would be the best SSD for it ?
Many Thanks
Doug
I HAVE INSTALLED SAMSUNG 850 PRO SSD 512GB MACBOOK PRO MID 2012 RUNNING SUPERFAST WITH PARALLEL WINDOWS.
Hi, my MacBook pro disc is rasheid. How can I Place a New disk if I don’t have the data?