

Raspberry Pi – Install Remote Desktop (XRDP)
To manage the Raspberry Pi over the network, it is also possible to access it remotely via remote desktop in addition to SSH and VNC. Microsoft’s Remote Desktop Protocol (RDP) enables the transmission and control of screen content over the network. This is particularly useful for Windows users, since Windows already has the appropriate client (Microsoft Terminal Services Client). In the following article I show step-by-step how to set up Remote Desktop on the Raspberry Pi and then access it using Windows/Mac/iPhone/Android.
Difficulty level:
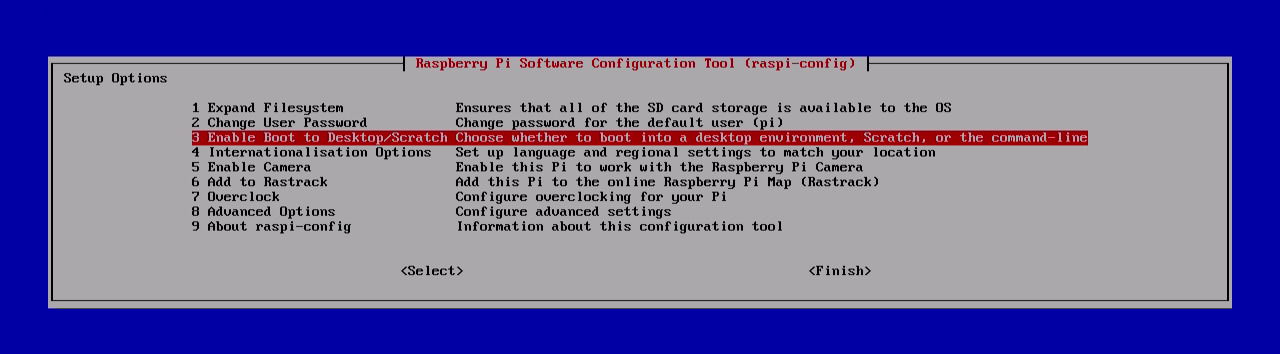
Schritt 1: Activate Boot to Desktop
First, the Raspberry Pi must be configured to start the (graphical) desktop after booting. This can be configured with a few clicks via raspi-config:
$ sudo raspi-config
Select the entry »3 Enable Boot to Desktop/Scratch« and then confirm »Desktop Log in as user ‘pi’ at the graphical desktop«.
Step 2: Install XRDP Server
NOTE – Raspberry Pi with PIXEL desktop
Unfortunately, XRDP does not work with the new Raspbian Image right away. The integrated RealVNC Server and XRDP are in conflict and cannot be used together. To resolve this conflict, RealVNC must be uninstalled before installing XRDP:
$ sudo apt-get purge realvnc-vnc-server
After boot to Desktop has been activated, the actual installation of the Remote Desktop Server follows. Under Linux, XRDP is a free implementation of the Remote Desktop Protocol. We can install these directly using the package manager APT. When the installation is complete, the XRDP daemon starts automatically.
$ sudo apt-get install xrdp
The basic installation is already done. In the future, the XRDP server will be started automatically in the background when the system is started.
If necessary, the XRDP settings in the files /etc/xrdp/xrdp.ini and /etc/xrdp/sesman.ini can still be adjusted. However, this is not mandatory and may only be required in special applications. That’s why I’m not going to go into that.
Step 3: Reboot
A restart of the Raspberry Pi is recommended to complete the setup:
$ sudo reboot
Step 4: Remote Desktop Client
To be able to access the Raspberry Pi remotely, we need a corresponding remote desktop client software on the client.
Windows
As already mentioned in the introduction, Windows comes with a suitable client. You can find it under:
All Programs -> Accessories -> Remote Desktop Connection
Mac OS X
If you have installed MS Office for Mac, you will find the Microsoft Client at “Applications → Remote Desktop Connection”. Otherwise it can be downloaded via iTunes – Microsoft Remote Desktop.
Other
For other operating systems the following clients are available:
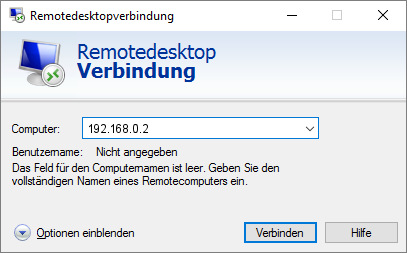
Step 5: Establishing a Remote Desktop Connection
To establish a remote desktop connection with the Raspberry Pi, we must first specify its IP address.
After we click on Connect, we get a login screen from the XRDP server of our Raspberry Pi. The access data are identical to those for SSH. If the user or password has not been changed under Raspbian, the default user is pi and the password is raspberry.
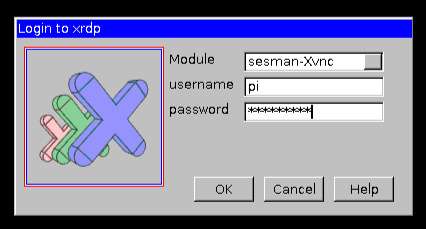
After successful registration we can already see the desktop of the Raspberry Pi after a few seconds and operate it with mouse and keyboard.
Rate this Post:


4.45/5 (11 votes)
When I went to install the ‘sudo apt-get install xrdp’, the installer couldn’t find the http address for the bits. It was clearly available but the command wouldn’t pull the files.
I had to issue ‘sudo apt-get update’ and let that process before I could install the xrdp package.
Why wouldn’t you just use VNC instead?
Great Post! Some questions and comments:
1. The post needs a little bit of an update for the newest Raspian version. Specifically Step 1: Boot to Desktop is no longer consistent with the options available and I had trouble navigating.
2. Is password login needed? I did auto-login and it seems to work fine.
3. The remote desktop seems to have a better screen view but less functionality than using VCN. For example, I can’t use the GUI Raspberry Pi Preferences list and have to go through command line. With VNC it all works fine. (I tested it with and without password login)
For reference: I’m using a new RasPi 3 and a 2.8″ resistive touch screen to do a camera activity. The screen situation gets a little weird with the three screens I have on the Pi.
excelent!
Worked fantastic on both RPi4B and RPi3B. With 2020-08-20-raspios-buster-armhf-full, did not have to uninstall RealVNC server. Thank you!!!