
MacBook Pro Retina: Upgrading to SSD (Howto)
Due to the special SSD design Apple uses in the Macbook Pro Retina, upgrading has so far been difficult. Fortunately this has now (at least partially) changed. Meanwhile, third-party manufacturers offer special SSD modules and M.2 adapters that enable an upgrade of the storage space.
Basically there are now three possibilities to upgrade the SSD of the Macbook Pro Retina. Here is a brief comparison with the various advantages and disadvantages of the individual methods:
SSD upgrade options
| Apple Original |
M.2 SSD + Adapter |
SSD from third party manufacturer |
|
|---|---|---|---|
| Advantages | SSD is guaranteed to work, no tinkering, full speed | Use of a standard M.2 SSD, (mostly) very fast | SSD guaranteed to work, compatible with MacBook, no tinkering |
| Disadvantages | Apple-SSD not available on the market, only (used) on eBay | requires special adapter, problem-free operation cannot be guaranteed, compatibility problems may occur (not all M.2 SSDs work without problems), troubleshooting may be necessary, tinkering, standby time may be shorter | Speed slightly slower than original Apple SSD |
| Effort | Installation is quite easy, just a few screws | Increased time and motivation for troubleshooting may be necessary, not all combinations run error-free right from the start | Installation is quite easy, only a few screws, the upgrade kit from Transcend comes with all necessary material and tools |
If you are looking for the simplest possible SSD upgrade, without compatibility problems and additional tinkering effort, it is clearly recommended to buy an upgrade kit from a third party manufacturer. In the following instructions I describe this path in detail and step-by-step.
Instructions: Upgrade with third-party SSD
Difficulty level:
Frequently asked questions
How much storage space does Macbook Pro (Retina) support?
There is no limit to storage size on Macbook Pro. Currently, however, only SSDs with a maximum of 960 GB are available. But you have to adapt the SSD type, because the 13 inch model fits a different type than the 15 inch model. In the following I have listed very precisely which SSD fits into which Macbook Pro, so that nothing goes wrong.
What tools do I need to upgrade?
All the essential materials and tools required for the upgrade are linked in the article.
Does Apple’s warranty remain in effect?
A clear no! Apple does not plan to upgrade the Macbook Pro Retina on its own. Apple’s warranty (if any) is therefore void. The upgrade of the SSD is at your own risk.
Which MBP Retina models can the SSD be upgraded?
| Apple model | Display size | Designation | Upgradeable |
|---|---|---|---|
| MBP Retina (Mitte 2015) | 13 inch 15 inch |
MacBookPro12,1 MacBookPro11,4 MacBookPro11,5 |
|
| MBP Retina (Mitte 2014) | 13 inch 15 inch |
MacBookPro11,1 MacBookPro11,2 MacBookPro11,3 |
|
| MBP Retina (Ende 2013) | 13 inch 15 inch |
MacBookPro11,1 MacBookPro11,2 MacBookPro11,3 |
|
| MBP Retina (Anfang 2013) | 15 inch 13 inch |
MacBookPro10,1 MacBookPro10,2 |
|
| MacBook Pro Retina (2012) | 15 inch 13 inch |
MacBookPro10,1 MacBookPro10,2 |
Alternative disk space expansion
If you don’t want to upgrade your SSD (the fear is unjustified), you can simply eliminate your storage bottleneck with an expansion card. Transcend cards are specially designed for Macbook Pro (2013 – 2015). The read/write rates of these cards are of course not comparable to those of an SSD connected via mSATA and are more like a USB stick. Nevertheless, this type of extension can be completely sufficient, depending on the application.
MacBook Pro (2013 – 2015)
- Transcend JetDrive Lite 330 64GB, SDXC
- Transcend JetDrive Lite 330 128GB, SDXC
- Transcend JetDrive Lite 330 256GB, SDXC
For 15 inch (MacBookPro11,2/11,3/11,4/11,5):
Compatible third-party SSDs
[Last update: 03/11/2018]
MacBook Pro Retina 2013-2015
MacBook Pro Retina 2013 (Early)
MacBook Pro Retina 2012
- Transcend-JetDrive 720, 240 GB, SATA III
- Transcend-JetDrive 720, 480 GB, SATA III
- Transcend-JetDrive 720, 960 GB, SATA III
15 inch (MacBookPro10,1):
MacBook Pro Non-Retina (2008 / 2009 / 2010 / 2011 / 2012)
Preparation
Basically, a backup should be made before starting a hardware upgrade. Therefore we do the following steps first:
- Create backup (e.g. using TimeMachine)
- Check created backup again for completeness
- Create bootable OSX-Recoverystick (Instruction)
Once everything is complete and a fresh backup is ready, MacBook Pro Retina can be shut down. Disconnect the power plug and other cables and place on a soft surface with the top side facing down.
Data migration
Option 1: Clone old SSD to new SSDn
- Install the new Transcend Jetdrive SSD in the supplied USB case and connect to MacBook Pro
- The new SSD must now be formatted for the first time using the hard disk utility (as “Mac OS Extended Journaled“)
- Afterwards a fully bootable 1:1 copy of the old SSD on the new Transcend SSD can be created with Carbon Copy Cloner or SuperDuper! (this process can take several hours).
Option 2: Reinstall macOS and restore the backup
- Create a backup using the TimeMachine for the later data restore before the upgrade.
- Create bootable OSX-Recoverystick (Instruction)
- Now the new SSD must be installed in the MacBook (Instructions see Installation)
- Once the SSD is installed in your MacBook, plug in the USB stick. Then, press and hold the ALT key to turn on the MacBook.
- You will now be asked from which medium to boot. Select the USB stick here.
- Before reinstalling, format the SSD using the disk utility (as”Mac OS Extendet Journaled“). After that macOS can be installed on the new SSD. Just follow the instructions on the screen.
- In the last step, the data and settings are now restored from the TimeMachine backup.
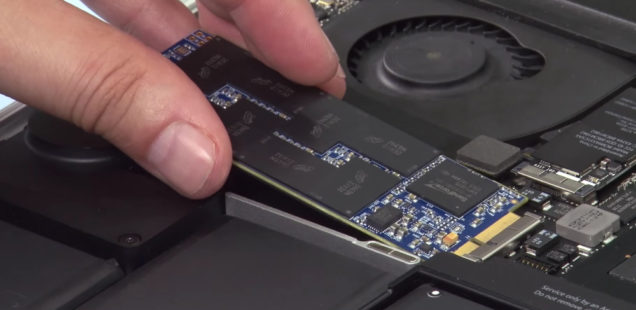
Installation
Tools
Transcend’s upgrade kit comes with all the necessary materials and tools. Two screwdrivers (Torx T-5 and Pentalobe) are included to open the chassis. An external USB case is also included.
Safety Recommendation
In principle, it is recommended to wear an antistatic wrist strap when working within reach of electronic components. This protects against electrostatic charging and prevents possible damage to electrical components in the Macbook. The wristband is striped over the arm and has a cable with a kroro clip, which is simply clamped to the radiator. Corresponding bracelets are already available for a few Euros (e.g. Rosewill Anti Static Wrist Strap).
Installation guide (video)
Basically the installation is quite simple. As always, it is important to take enough time for the installation and to proceed carefully. The YouTube video provided by Transcend explains the upgrade very clearly:
https://youtube.com/watch?v=gBEf1DDTuAE
Start-up / completion
Now it’s time to boot the MacBook Pro Retina from the new SSD for the first time. If the hard disk has been cloned to the SSD, the start volume may have to be redefined (System settings → Start volume).
Please do not be frightened if the boot process is not noticeably faster after a new installation. Because Spotlight has to rebuild the index completely, which can take quite a long time.
If there are any problems despite the steps described above (e.g. permanently high speed fans), the SMC (manual) and NVRAM / PRAM (manual) should also be reset.
Rate this Post:

5.00/5 (1 votes)